스웨거(Swagger) 사용법, 스웨거로 API 명세서 작성하기
- 개발 지식
- 2023. 3. 14.
스웨거(Swagger)란?
스웨거는 개발자가 REST 웹 서비스를 설계, 빌드, 문서화, 소비하는 일을 도와주는 대형 도구 생태계의 지원을 받는 오픈 소스 소프트웨어 프레임워크이다 - 위키백과-
스웨거를 이용하면 간편하게 API 문서를 작성할 수 있다. 뿐만 아니라 간단하게 API 테스트도 해볼 수 있다.
스웨거외에도 유명한 API 문서 툴로는 Spring Rest Docs 등이 있다.
Spring Rest Docs와 스웨거는 각각의 장단점이 존재한다.
우리는 스웨거가 적용하기 간단하고, 프런트엔드와 빠른 협업을 위해 당장 테스트를 하지 않아도 문서를 만들 수 있는 스웨거를 사용하기로 했다.
Spring Rest Docs는 테스트코드를 통과하지 않으면 문서를 만들 수 없기 때문이다.(이것은 단점이자 장점이다)
스웨거로 API 명세서 작성하기
Dependency 추가
스프링부트 환경에서 스웨거를 사용하려면 우선 dependency를 추가해줘야 한다.
<Gradle>
// Swagger2 gradle
implementation (group: 'io.springfox', name: 'springfox-swagger2', version: '2.9.2'){
    exclude module: 'swagger-annotations' exclude module: 'swagger-models'
}
implementation "io.swagger:swagger-annotations:1.5.21"
implementation "io.swagger:swagger-models:1.5.21"
implementation group: 'io.springfox', name: 'springfox-swagger-ui', version: '2.9.2'
<Maven>
<!-- springfox-swagger2 -->
    <dependency>
      <groupId>io.springfox</groupId>
      <artifactId>springfox-swagger2</artifactId>
      <version>2.9.2</version>
      <exclusions>
        <exclusion>
          <groupId>io.swagger</groupId>
          <artifactId>swagger-annotations</artifactId>
        </exclusion>
        <exclusion>
          <groupId>io.swagger</groupId>
          <artifactId>swagger-models</artifactId>
        </exclusion>
      </exclusions>
    </dependency>
    <!-- springfox-swagger-ui -->
    <dependency>
      <groupId>io.springfox</groupId>
      <artifactId>springfox-swagger-ui</artifactId>
      <version>2.9.2</version>
    </dependency>
    <dependency>
      <groupId>io.swagger</groupId>
      <artifactId>swagger-annotations</artifactId>
      <version>1.5.21</version>
    </dependency>
    <dependency>
      <groupId>io.swagger</groupId>
      <artifactId>swagger-models</artifactId>
      <version>1.5.21</version>
    </dependency>
우리는 Gradle을 사용하기 때문에 Gradle 의존성을 추가해 줬다.
주의 깊게 봐야 할 점은 gradle, maven 모두 해당 버전의 swagger-annotations, swagger-models를 제거하고 1.5.21 버전의 annotaions, models를 추가했다는 점이다.
이유는 2.9.2 버전에서 Long 타입의 필수 파라미터에 example이 없는 경우 "" 공백이 Long 타입 파라미터에 들어가기 때문에 NumberFormatException이 발생하기 때문이다.
Configuraion 클래스 작성
@Configuration
@EnableSwagger2
@EnableAutoConfiguration
public class SwaggerConfiguration {

    private final String version = "v1";

    private ApiInfo apiInfo() {
        return new ApiInfoBuilder()
                .title("review API")
                .description("리뷰콕 API 명세서")
                .build();
    }

    @Bean
    public Docket commonApi() {
        return new Docket(DocumentationType.SWAGGER_2)
                .groupName(version)
                .apiInfo(this.apiInfo())
                .select()
                .apis(RequestHandlerSelectors.basePackage("team.side.review"))
                .paths(PathSelectors.any())
                .build();
    }
}
스웨거를 사용하기 위해서는 위와 같은 SwaggerConfiguration 클래스를 작성해주어야 한다.
위에서 .apis(RequestHandlerSelectors.basePackage("team.side.review")) 부분을 보면
베이스 패키지의 위치를 설정할 수 있다.
자세한 내용은 스웨거 공식 문서를 참고하자.
Controller 설정
@Slf4j
@RestController
@RequestMapping("/users")
@Api(value = "유저페이지 API")
public class UserController {

    @PostMapping("/login")
    @ApiOperation(value = "로그인 API")
    public ResponseEntity<ResponseDto<LoginResponseDto>> login(@RequestBody LoginRequestDto loginRequestDto){
        // TODO : LoginService 구현

        LoginResponseDto loginResponseDto = new LoginResponseDto("example@gmail.com", "success");

        return ResponseEntity.ok(ResponseDto.success(loginResponseDto));
    }

    ...
}
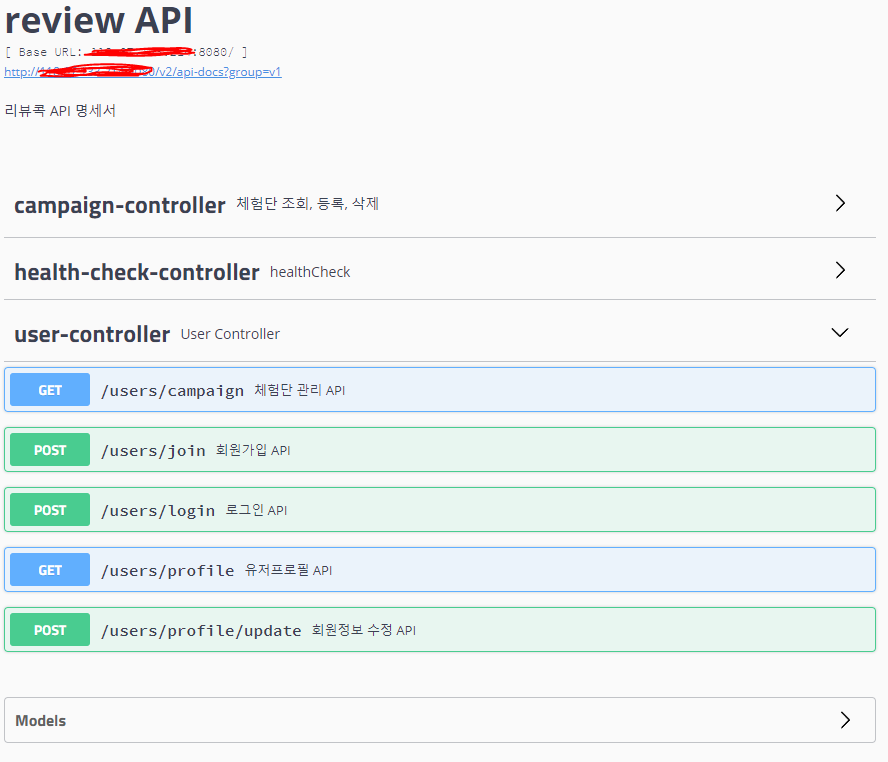
@Api 어노테이션을 통해 이름을 설정할 수 있다.
메서드에는 @ApiOperation 어노테이션을 통해 이름을 설정할 수 있다.

{host 주소}/swagger-ui.html# 로 접속하면 스웨거의 API 문서를 볼 수 있다(서버가 실행돼있을 때)
Model 설정
@Getter
@NoArgsConstructor(access = AccessLevel.PROTECTED)
@ApiModel(value = "로그인 정보")
public class LoginRequestDto {

    @ApiModelProperty(value = "이메일", required = true)
    private String email;

    @ApiModelProperty(value = "패스워드", required = true)
    private String password;

    @Builder
    public LoginRequestDto(String email, String password) {
        this.email = email;
        this.password = password;
    }

}
Dto와 같은 데이터 모델에 @ApiModel 어노테이션을 붙여 이름을 설정할 수 있다.
멤버 변수에는 @ApiModelProperty를 통해 이름과, 필수 여부 등을 설정할 수 있다.

그럼 위와 같이 어떤 데이터가 오가는지 확인할 수 있다.
참고
'개발 지식' 카테고리의 다른 글
| MSA(Micro Service Architecture)란? MSA vs Monolithic (1) | 2024.06.12 |
|---|---|
| 미들웨어(Middleware)란? (0) | 2023.08.18 |
| 프레임워크(Framework)와 라이브러리(Library)의 차이 (0) | 2023.01.05 |
| CAP 정리란? 브루어의 정리란? (0) | 2022.12.29 |
| 해시 테이블의 크기를 소수로 정하는 이유, hashCode() 에서 31을 쓰는 이유 (0) | 2022.11.03 |
